Pakistan offers a spectacular canvas for night sky photographers looking to capture the cosmos. In “The Ultimate Guide to Night Sky Photography in Pakistan: Capture the Cosmos,” you’ll discover why the serene landscapes of Skardu Valley and the remote expanses of Hingol National Park make Pakistan a prime location. I once used a 14mm wide-angle lens and a 30-second exposure to capture the Milky Way arching over the Karakoram Range. The minimal light pollution and high-altitude settings provide clear, vibrant views, perfect for photographers seeking to immortalize the heavens with a full-frame sensor camera.
Essential Gear for Astrophotography: Cameras, Lenses, and More
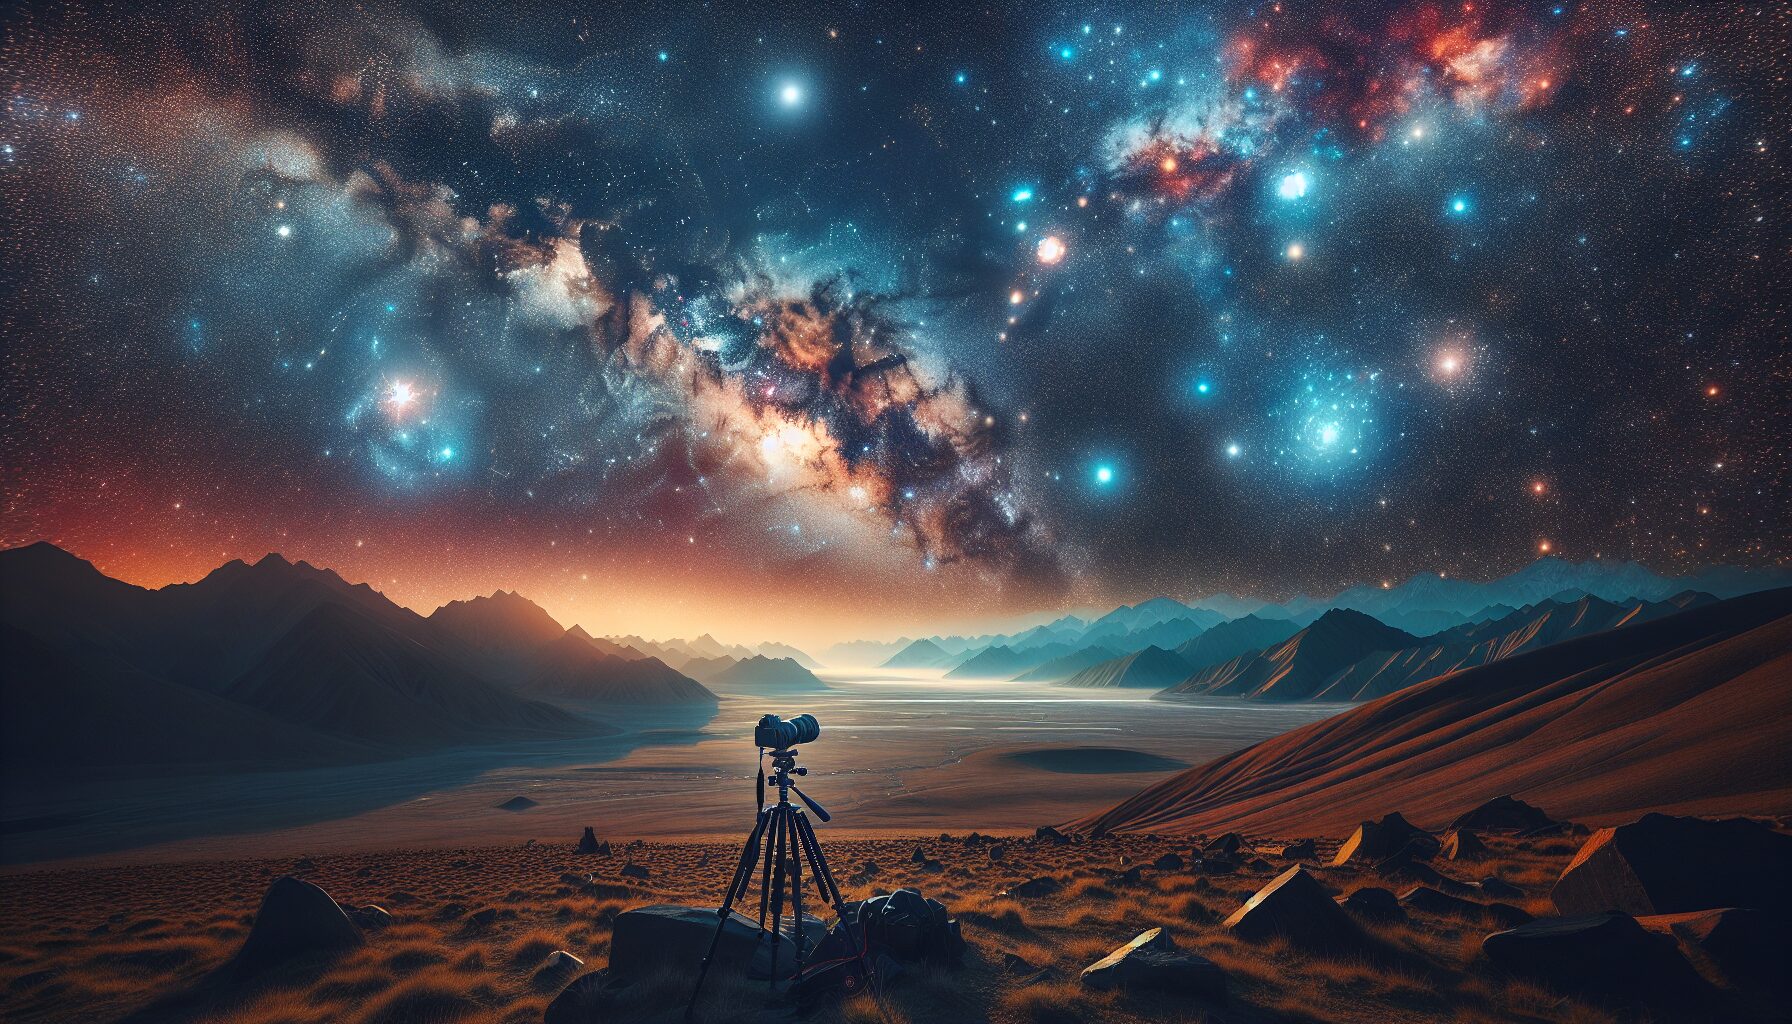
Capturing the night sky over the serene landscapes of Pakistan is an experience like no other. To bring the stars into focus, having the right gear is essential.
Choosing the Right Camera
For beginners and seasoned photographers alike, a full-frame sensor camera is invaluable. Its ability to perform in low-light conditions is unmatched. I recall shooting the Milky Way over the Deosai Plains with my trusty Nikon D850. The full-frame sensor captured the intricate details of the star clusters without noise.
The Perfect Lens
A wide-angle lens is your best friend for astrophotography. It allows you to capture expansive sky views. When I shot the star trails over Ratti Gali Lake, I used a 14mm lens with an aperture of f/2.8. This setup let in ample light, capturing vivid details in the dark.
Tripod Stability
Long exposure shots require a stable base. A sturdy tripod is crucial. I recommend the Manfrotto Befree tripod. Its lightweight design makes it perfect for carrying on treks to remote locations, like the Fairy Meadows, without compromising stability.
Additional Essentials
- Remote Shutter Release: Prevent camera shake during long exposures.
- Portable Power Bank: Essential for extended night shoots in areas like Skardu, where access to electricity is limited.
- Red LED Headlamp: This is a game-changer for preserving night vision when adjusting settings in the dark.
Being prepared with the right gear allows you to focus on the art of capturing the cosmos. Each piece of equipment plays a role in ensuring your shots of Pakistan’s night skies are as breathtaking as the experience itself.
Top Locations in Pakistan for Capturing the Night Sky

Imagine standing in the remote valleys of Hunza Valley, where the Milky Way sprawls majestically above the rugged peaks. With a camera boasting a full-frame sensor and a fast lens like a 24mm f/1.4, you can capture the intricate details of the cosmos. A slow shutter speed of 25 seconds and an ISO setting of 3200 will reveal the hidden beauty of the stars.
The Charms of Deosai Plains
Known as the “Land of Giants,” the Deosai National Park offers a pristine view of the night sky. Located at an average altitude of 4,114 meters, this location is ideal for astrophotography. The high altitude and minimal light pollution create the perfect conditions to photograph celestial events. Remember to carry a tripod for stability and a remote shutter release to prevent camera shake.
Skardu’s Starry Nights
Skardu, nestled in the heart of the Karakoram Range, provides a breathtaking backdrop for night sky photography. During my last visit, I used a tracking mount to follow the stars’ movement, allowing for longer exposures without star trails. This technique brings out the vibrant colors and details of the night sky, making it an unforgettable experience.
Ranikot Fort’s Historical Vistas
Ranikot Fort, dubbed the “Great Wall of Sindh,” combines historical allure with astronomical wonder. Shooting here offers a unique blend of ancient architecture and the cosmos. Use a wide-angle lens to encompass the vastness of the fort and the sky. The fort’s remote location ensures minimal light interference, perfect for those iconic star trails.
- Ensure your camera settings are optimized for low light, such as using a high ISO.
- Scout locations during the day to find the best compositions for your shots.
For more insights on the best places for astrophotography, check out our detailed guide on Pakistan’s top astrophotography locations and tips. A report by NASA supports that high-altitude areas like these enhance visibility due to thinner atmospheric layers, making them ideal for capturing celestial wonders.
Techniques for Stunning Night Sky Photography

Capturing the night sky over the majestic landscapes of Pakistan can be a thrilling experience. Mastering the art of night sky photography involves understanding a few key techniques. Here’s how you can elevate your night photography skills to capture the cosmos like never before.
Mastering Long Exposure
The essence of night sky photography lies in long exposure. One evening in the serene deserts of Thar Desert, I set my camera to a 15-second exposure with a wide aperture of f/2.8. This allowed more light to hit the sensor, beautifully illuminating the stars against the dark canvas of the sky.
Choosing the Right Gear
For crisp, clear shots, a camera with a full-frame sensor is vital. I prefer using a DSLR with a low-light sensitivity feature, such as the Nikon D850. Pair it with a fast lens, like a 24mm f/1.4, to capture more detail. Don’t forget a sturdy tripod; it’s essential for keeping your camera steady during long exposures. When I first tried capturing star trails at Hunza Valley, my lightweight tripod wasn’t steady enough, resulting in blurry trails. Investing in a reliable tripod made all the difference.
Optimal Settings for Night Photography
- ISO: Start with an ISO of 1600 but be ready to adjust. In areas with less light pollution, like Deosai National Park, you might need to increase it.
- Aperture: Keep it wide open. An f-stop of f/2.8 or lower works well to let in more light.
- Shutter Speed: Use a shutter speed between 10 to 30 seconds. This varies depending on the amount of ambient light and the desired star effect.
Experiment with Composition
To enhance your photographs, experiment with different compositions. Placing an interesting foreground element, like a silhouette of trees or mountains, can add depth. During a shoot in the Skardu region, I included the outline of a lone tree to create a sense of scale against the Milky Way.
By combining these techniques, you’ll be well on your way to capturing stunning night sky images across Pakistan’s breathtaking landscapes.
Understanding and Using Light Pollution Maps

Light pollution maps are indispensable for night sky photography, especially in a country like Pakistan where urbanization and industrial growth are on the rise. When planning a trip to capture the cosmos, these maps help you pinpoint locations with minimal light interference. A tool I frequently use is the Light Pollution Map, which offers real-time data on light conditions across the country. The darker the area on the map, the better your chances of capturing vivid celestial details.
Why Light Pollution Maps Matter
Light pollution affects the quality of your night sky images by washing out stars and other celestial bodies. During a recent trip to the scenic valleys of Hunza, I relied on a light pollution map to find a secluded spot away from the town lights. Using a camera with a full-frame sensor and a wide aperture lens, I set a long exposure time to capture the Milky Way in all its glory. The results were stunning, thanks to the dark skies that the map had guided me to.
How to Use Light Pollution Maps
- Identify Dark Zones: Look for areas marked in deep blue or black on the map. These are typically remote regions like the Deosai National Park, known for its pristine night skies.
- Plan Your Trip: Cross-reference the map with weather forecasts to ensure clear skies. An unexpected cloud cover can ruin even the most well-planned shoot.
- Use Technology: Apps like SkyView can augment your planning by showing real-time celestial positions, ensuring you’re ready when the stars align.
- Share Your Experience: Consider contributing to our article on astrophotography locations in Pakistan to help fellow enthusiasts find the best spots.
By understanding light pollution maps, you can dramatically improve your chances of capturing a breathtaking night sky. Whether you’re a seasoned photographer or just starting, these tools are vital for anyone looking to explore the ultimate guide to night sky photography in Pakistan.
Post-Processing Tips for Enhancing Your Night Sky Photos
Enhancing night sky photos requires both skill and the right software. When I captured the breathtaking Milky Way over the serene landscapes of Skardu, I relied on post-processing to bring out the galaxy’s vibrant colors. Here are some tips to help you achieve stunning results.
Essential Software
Using software like Adobe Lightroom or Photoshop is crucial. These tools offer advanced features for enhancing your night sky shots. For those seeking a free alternative, GIMP is an excellent choice with robust editing capabilities.
Basic Adjustments
Start with basic adjustments like exposure, contrast, and highlights. Increase the exposure slightly to reveal hidden details but avoid overexposure. Adjusting the contrast will help define the stars against the dark sky. For one of my shots at Deosai National Park, I found that subtly increasing the highlights enhanced the Milky Way’s structure without losing the surrounding stars.
Noise Reduction
Night photography often involves high ISO settings, resulting in noise. Use Lightroom’s noise reduction tool to smooth out grainy textures. Be cautious; excessive noise reduction can lead to loss of detail. When editing a photo from the Thar Desert, I discovered that a balance of 25% luminance and 20% detail retained the stars’ sharpness while reducing noise.
Color Calibration
Ensure your colors are accurate by adjusting the white balance. A cooler temperature often enhances the night sky’s blue tones. When processing an image from the Khunjerab Pass, setting the white balance to around 3700K highlighted the celestial hues beautifully.
Advanced Techniques
- Stacking: Combine multiple exposures to reduce noise and enhance detail. Software like DeepSkyStacker can automate this process.
- Dodging and Burning: Use these techniques to accentuate specific areas. Lightly dodge the brighter stars to make them pop.
These techniques will help you transform your night sky photos into stunning works of art, capturing the beauty of Pakistan’s celestial landscapes.
Conclusion
Embarking on the enchanting journey of photographing the night sky in Pakistan is an experience both awe-inspiring and educational. There’s a special moment when you’re nestled in the serene landscapes of Skardu, with your camera tripod firmly planted on the rocky terrain. I remember setting my ISO to 3200 and opening the aperture to f/2.8 to capture the ethereal glow of the Milky Way. The full-frame sensor of my camera picked up details invisible to the naked eye, revealing a cosmic tapestry above the ancient mountains. Such breathtaking views are not uncommon in this region; the clear skies and minimal light pollution offer the perfect canvas for your astrophotography adventures.
Pakistan’s diverse geography provides a treasure trove of ideal locations, from the deserts of Tharparkar to the lush valleys of Hunza. Each spot presents unique challenges and rewards. For instance, capturing star trails might require a long exposure of up to 30 minutes to highlight Earth’s rotation. A remote shutter release is crucial to avoid camera shake during these extended shots. It’s these technical nuances that transform a simple photograph into a stunning masterpiece, worthy of the cosmos it captures.
As you refine your skills, don’t forget the essence of night sky photography: patience and experimentation. The perfect shot might elude you at first, but with perseverance and the right gear, like a sturdy telescope mount or a camera with exceptional low-light capabilities, you’ll soon capture the celestial wonders like a seasoned photographer. Whether you’re a local enthusiast or a curious traveler, remember that the beauty of Pakistan’s night sky is best appreciated with a blend of technical proficiency and a sense of wonder. This ultimate guide is just the beginning of your stargazing journey, inviting you to explore, learn, and capture the cosmos in all its glory.
Continue Exploring
Uncover the vibrant world of street photography in Pakistan, where every snapshot tells a story of beauty, legality, and respect. Dive into the nuances of capturing the essence of life while honoring the culture and laws. Don't miss out on this essential guide!
Frequently Asked Questions
What are the best locations for night sky photography in Pakistan?
Pakistan offers several stunning locations for night sky photography, including the serene valleys of Skardu, the desert landscapes of Thar, and the remote areas of Hunza. These spots are renowned for their low light pollution and clear skies, making them ideal for capturing the cosmos.
What camera settings should I use for astrophotography in Pakistan?
For astrophotography in Pakistan, use a wide aperture (f/2.8 or wider), a high ISO setting (1600-3200), and a shutter speed between 15 to 30 seconds. These settings will help you capture the faint light from stars and other celestial objects. Always adjust based on the specific lighting conditions and your camera’s capabilities.
Which gear is essential for night sky photography in remote areas of Pakistan?
Essential gear for night sky photography in Pakistan includes a sturdy tripod, a DSLR or mirrorless camera with a wide-angle lens, and a remote shutter release to avoid camera shake. Additionally, pack extra batteries and memory cards, as well as a headlamp with a red light to preserve your night vision while adjusting your equipment.
Leave a Reply